Curved MPR
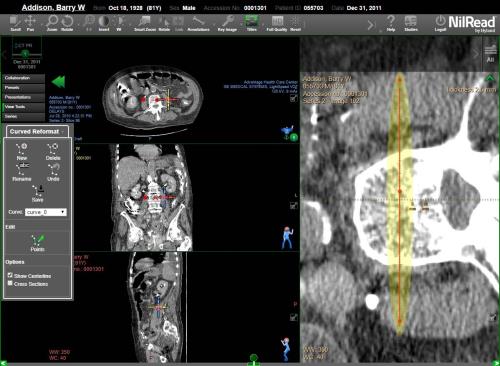
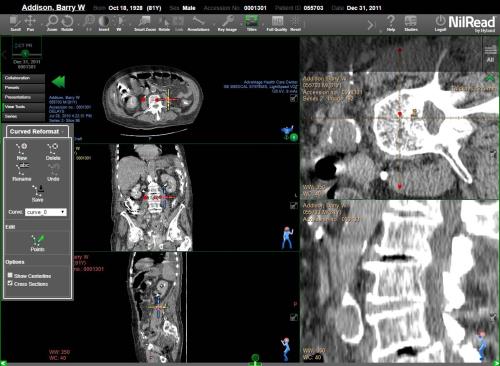
Curved MPR allows you to define a curve in the volumetric dataset and then view an image along this curve. This is useful for viewing structures such as blood vessels or the spine.
- Select View.
- Under MPR Views, select Curved. Three MPR views are shown on the left and a blank viewport is shown on the right.
- Select View Tools (side panel). The curved reformat tools are shown.

Create a curved reformat
- Select New.
- Click (or tap) to add points to the curve reformat. Once you have added at least two points, the curved reformat view is shown in the viewport on the right.
For MPR images, points are shown as filled circles if the corresponding point is visible in the current MPR or curvilinear view.
On planar slabs, points are shown as filled circles (when the point is on the reformat plane), ^ (when there is a control point on a plane located closer to the current view) or v (when there is a control point on a plane located further away from the current view). The centerline is not displayed on planar slabs.
- To set the focus point, right-click a seed, then select Focus to this Seed.
- When done adding points, select Save. The curved reformat will be saved in the local database and will be available when the study is reloaded.
Show Centerline
Applies to the curved reformat view (right viewport). Select this option to view a polyline connecting all of the points created for the reformat.
Cross Sections
Select this option to view a cross-sectional reformatted view perpendicular to the centerline through the focus location. The cross-section is shown in the bottom-right viewport and is a reformat along the plane shown in the top-right viewport.
Edit a curved reformat
- In the Edit area, select Points.
- To edit a point, click (or tap) on the point, then drag the point to a new location. Select Undo to remove the last action you performed.
- To move through the points, right-click a point, then select Previous Seed Point or Next Seed Point.
- To delete a point, right-click the point, then select Delete Seed Point.
Rename a curved reformat
- Select a curved reformat from the Curve list.
- Select Rename. Enter a new name, then select OK.
View a saved curved reformat
To view a different curved reformat, select a curved reformat from the Curve list.
Delete a curved reformat
- Select a curved reformat from the Curve list.
- Select Delete. The curved reformat will be deleted from the local database.